Learning hoof nippers is the fastest way to build real skill as a new farrier. These hoof nipper tips for new farriers show you exactly how to trim excess horn with clean, measured cuts and steady hands. You will learn how to read the hoof, position the horse’s leg, hold the tool correctly, and sidestep the errors that trip up most beginners. Master these fundamentals, and you will trim with more accuracy, more confidence, and far less strain on your body. Every tip here reflects proven farrier practice, so you can apply it on your very next trim. Treat this guide as a working checklist you return to until each step feels automatic.
Key Takeaways
• Hoof nippers trim only excess wall, never the live sole or frog.
• Hold the nippers with both hands and cut with your legs, not just your wrists.
• Start at the toe, move toward the heels, and follow the natural hoof angle.
• Small, measured cuts protect balance and prevent over trimming.
• Practice on training hooves and under an experienced farrier before working solo.
What Do Hoof Nippers Do?
Hoof nippers are a plier style farrier tool that trims excess hoof wall because the equine hoof grows continuously and must be shortened to stay balanced. New farriers rely on hoof nippers to remove flared, cracked, or overgrown wall cleanly before the rasp refines the final surface.
This single tool sets the length and shape of the whole trim, so learning it well changes everything about your work. The two sharp jaws close on the wall and shear it, much like a strong pair of scissors made for horn. You control depth by how far the blades reach onto the wall, and you control shape by the angle you follow around the hoof. Good horse hoof trimming starts with this cut, so the rest of the work builds on the level base you create here. When the nippers do their job well, the rasp has very little correcting left to do, and the finished foot looks clean.
Think of it this way. The nippers do the heavy removal, and the rasp does the fine finishing. According to the American Farrier’s Association, clean tools and clear technique separate a safe trim from a risky one. Learn what the nippers are meant to do, and you will stop asking them to do the rasp’s job or the knife’s job.
How to Use Hoof Nippers as a Beginner
Learning how to use hoof nippers starts with a simple, repeatable routine you follow on every hoof. A steady sequence keeps you calm, protects the horse, and produces even results while your skill grows. Beginner farrier tips almost always come back to one idea, which is consistency before speed.
Here is a reliable beginner routine for hoof trimming for beginners:
- Clean the hoof fully with a hoof pick and brush so you can see the wall, sole, and frog.
- Study the hoof and find the natural angle, the flares, and any cracks before you cut.
- Position the leg comfortably and support it so the horse can relax and stand square.
- Set the nippers at the toe, take a small bite of wall, and make your first controlled cut.
- Work steadily toward each heel, keeping the blades at one even angle the whole way.
- Stop often, lower the hoof, and check balance from the front and the side.
- Refine the edge with a rasp, then repeat the same steps on the next hoof.
Here is the key thing. Using hoof nippers correctly is far more about reading the hoof than about raw hand strength. The American Association of Equine Practitioners stresses that a balanced trim supports soundness, so slow, thoughtful cuts always beat fast, careless ones. Follow the routine, and the tool starts to feel natural in your hands within a few sessions.
Repeat this exact order on every foot until it becomes second nature. A fixed routine frees your mind to focus on the hoof in front of you rather than on what comes next. That mental space is where real skill and confidence begin to grow. Say each step to yourself on your first horses if it helps you stay on track. Spoken cues keep your sequence tight until your hands remember the order on their own.
Understand the Horse’s Hoof before Cutting
You must understand hoof anatomy before you ever close the nippers on a hoof. Knowing which structures to trim and which to protect is the foundation of safe, confident work. New farriers who skip this step remove the wrong tissue and cause pain, lameness, or lasting damage. Spend a few minutes on each foot simply looking and touching before any cut, so the anatomy becomes familiar.
The hoof wall is the hard outer shell of the hoof because it carries most of the horse’s weight and protects the sensitive inner structures. New farriers trim only the excess wall, never the live sole or frog, so the horse stays sound and comfortable.
When you learn how to trim a horse hoof, this rule comes first, always. The better you know a healthy hoof, the faster you will spot one that needs extra care. Use the guide below to see what each structure does and how to treat it during a trim.
| Hoof Structure | Main Role | Beginner Action |
| Hoof wall | Bears weight and protects the foot | Trim excess length only |
| Sole | Shields the inner foot from the ground | Leave the live sole alone |
| Frog | Absorbs shock and aids traction | Trim only loose, ragged flaps |
| White line | Joins wall to sole | Use it as a depth guide |
| Bars | Support the heels | Trim lightly and evenly |
Prepare and Position the Hoof Correctly
Correct hoof preparation and positioning make every cut safer and more accurate. Pick out the hoof, brush away debris, and inspect the sole and frog before you reach for the nippers. A clean hoof lets you read the wall clearly and judge exactly how much to remove.
Position the leg so the horse balances on the other three feet without leaning on you. Hold a front foot between your knees and rest a hind foot across your thigh, keeping your back straight and your core engaged. Good horse leg positioning protects your body and helps the horse stand quietly through the whole trim.
The bottom line is this. A well prepared hoof and a relaxed stance remove most of the difficulty before you cut. Rush the setup, and you fight the horse and the tool at the same time. Give this step the time it deserves, and the actual trimming becomes far easier. Watch the horse for signs of tension, such as a stiff back or a pulled foot, and reset before you continue. A calm animal and a clean, well lit hoof let you cut with confidence rather than guesswork.
Hold Hoof Nippers with Both Hands
Knowing how to hold hoof nippers is one of the most important skills you will build. Grip both handles firmly, wrap your fingers around them, and keep your thumbs steady for control. Correct tool grip gives you the leverage to shear the wall cleanly instead of crushing it.
Cut with the power of your legs, back, and shoulders rather than your wrists alone. This body driven motion produces strong, even cuts and reduces hand fatigue over a long day of work. Farrier body position matters here, so keep your frame stacked over the hoof and your elbows close to your body.
Think of it this way. The nippers are a lever, and your whole body is the engine. Squeeze with just your hands, and you tire fast and cut poorly. Drive the cut from your core, and clean removal starts to feel almost effortless even on tough feet. Keep both handles moving together so the blades meet squarely on the wall. A balanced squeeze protects your wrists and gives you the same clean cut on the last hoof as on the first.
Make Small, Controlled Cuts
Small, controlled cuts are the safest and most accurate way to trim the wall. Take modest bites of horn, close the blades fully, and let the tool do the shearing work. They protect balance and give you time to reassess after every pass around the foot.
Avoid the temptation to remove long strips of wall in one aggressive squeeze. Large bites tear the horn, hide your depth, and lead straight to over trimming. Steady cutting depth keeps the surface level and the horse comfortable from the first cut to the last. Apply firm, even hand pressure on both handles so the blades meet the wall at the same moment. Balanced hand pressure gives you a clean shear and stops the tool from twisting off line.
Here is where most new farriers go wrong. They trade accuracy for speed far too early in their training. Prioritize clean, measured cuts now, and speed will follow naturally with time and repetition. Patience at this stage pays off on every horse you trim for the rest of your career. After each pass, run your thumb along the edge to feel for high spots the blades left behind. That quick check tells you where to place the next cut and keeps the whole surface even.
Correct Hoof Nipper Technique for New Farriers
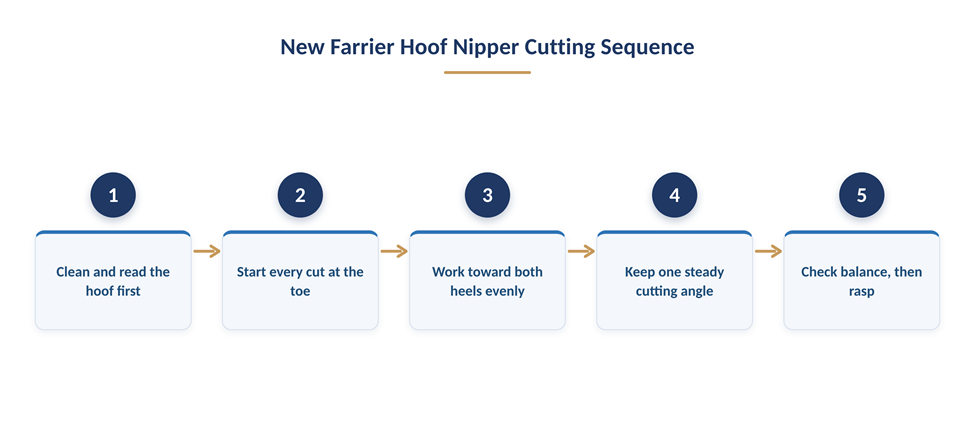
Correct hoof nipper technique follows a clear path around the hoof at one steady angle. A repeatable pattern keeps your trim symmetrical and stops you from removing more wall on one side. New farriers who master this pattern produce balanced hooves that hold their shape for the full trim cycle.
Great technique blends direction, angle, and constant checking into one smooth motion. When these three habits work together, your cuts stay even and your confidence climbs steadily. Recognized farrier educator Doug Butler, author of The Principles of Horseshoeing, teaches that consistent technique is what turns a beginner into a reliable trimmer. Aim to make the same trim the same way every time, so your results stop depending on luck or mood. Repeatable technique is what lets you trim a nervous horse or a hard foot without losing your standard.
Start at the Toe and Work Toward the Heels
Always start your cut at the toe and work back toward each heel. The toe is the thickest, most overgrown part of the wall, so it sets the length for the rest of the foot. Beginning here gives you a clear reference point for every cut that follows.
Move in small, connected bites along one side, then repeat on the other side. This order keeps both sides even and makes uneven hoof trimming far less likely. Match your two passes so the hoof stays symmetrical from heel to heel and looks balanced on the ground.
Here is the key thing. A consistent starting point removes guesswork from the entire trim. Wander around the hoof at random, and balance slips away quickly. Anchor every trim at the toe, and the rest of the foot falls into place with far less effort. Picture the hoof as a clock face, with the toe at twelve and the heels at five and seven. Working outward from the toe in both directions keeps your bites even and your rhythm steady.
Maintain an Even Cutting Angle
Hold the nippers at one even cutting angle from the first bite to the last. The blades should follow the natural slope of the wall, roughly matching the hoof’s existing angle. A steady trimming angle produces a flat, level surface that the rasp can finish easily.
Watch the plane of the blades as you travel around the foot, and resist tipping them inward. Tipping the jaws digs into live tissue and invites cutting too deeply. Good tool alignment keeps the cut on the wall where it belongs and keeps the horse safe.
The bottom line is this. Angle control is what creates a level bearing surface. Change the angle mid trim, and you build in a wobble the horse will feel with every step. Keep the blades true, and each hoof lands flat and wears evenly between visits. A common fix is to drop your elbows and let the tool sit flat rather than forcing it. Let the wall guide the blades, and your angle stays honest all the way around the foot.
Check Hoof Balance Throughout the Trim
Check hoof balance often, not just at the end of the trim. Lower the hoof to the ground, step back, and view the foot from the front and the side. Frequent checks catch small imbalances before they become large problems on the horse.
Look for even wall height on both sides and a smooth line from toe to heel. Comparing the foot to its partner on the opposite leg helps you spot hoof symmetry issues quickly. Your accuracy grows every time you pause to look before you cut again.
Think of it this way. Your eyes are as important as your hands during a trim. Trim with your head down the whole time, and you will miss the balance the horse needs. Build the habit of looking, and balanced feet become your normal result. Watch the horse walk a few steps once you finish, since movement reveals balance that a static foot can hide. A hoof that breaks over cleanly and lands flat is the proof that your cuts were true.
Common Hoof Nipper Mistakes Beginners Make
Most common hoof nipper mistakes come from moving too fast or misreading the hoof. Knowing these errors in advance is the easiest way to avoid them at the horse. New farriers who study the pitfalls first protect both the horse and their own growing reputation.
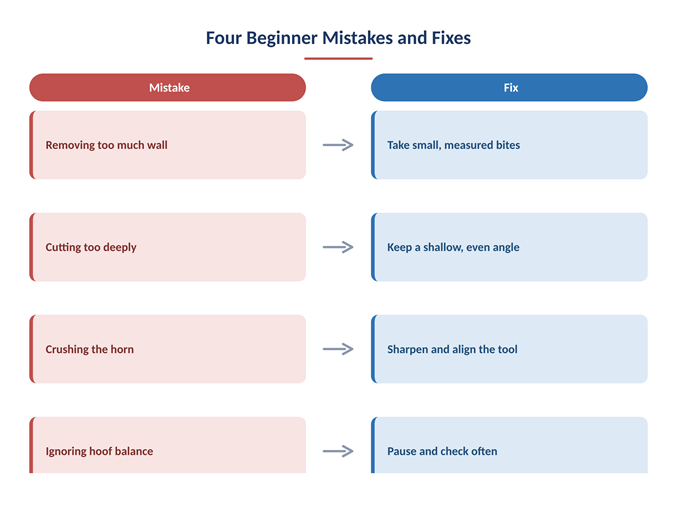
Every mistake below has a simple, direct fix you can apply right away. Awareness plus a clear correction turns a weakness into a strength. The table maps each error to what causes it and how to solve it. Keep this list in mind on your early trims, since naming a mistake as it happens is the first step to fixing it. Most beginners repeat only a handful of errors, so learning these few well protects almost every horse you meet.
| Common Mistake | Why It Happens | The Correct Fix |
| Removing too much wall | Bites are too large | Take small, measured cuts |
| Cutting too deeply | Blades tip into live tissue | Keep an even, shallow angle |
| Crushing the wall | Dull or misaligned blades | Sharpen and align the tool |
| Ignoring balance | Rushing without checks | Pause and view often |
| Uneven sides | Random cutting order | Start at the toe each time |
Removing Too Much Hoof Wall
Removing too much wall is the most common beginner error, and it leaves horses sore. Excess removal thins the wall past its safe limit and exposes sensitive structures underneath. Trim conservatively, because you can always remove a little more, but you cannot put horn back.
Take small bites and check length against the sole and the white line as you go. When in doubt, stop early and reassess rather than push for a shorter foot. This cautious habit is the heart of preventing excess removal on every hoof.
A horse that lands short and tender will remember the experience and grow harder to handle. Protect the animal and your own confidence by leaving a small margin of wall. That margin is easy to refine and impossible to regret. Use the widest part of the sole and the natural collateral grooves as depth guides on each foot. These landmarks tell you how much wall is truly excess and how much the horse still needs.
Cutting Too Deeply
Cutting too deeply happens when the blades tip inward and bite past the wall. This reaches live tissue, causes bleeding, and can lame the horse for days. Keep the nippers flat against the wall and follow the natural angle to stay in the dead horn.
Watch your depth on every cut and slow down through the quarters and heels, where the wall thins. If you feel the horse react, stop and check your position at once. Careful depth control keeps the trim inside the safe zone from start to finish.
Depth errors often trace back to a poor stance or a tired grip. Reset your position, breathe, and take one clean cut at a time. Steady focus beats speed every single time you pick up the nippers. If the wall suddenly feels softer under the blades, you are likely nearing live tissue, so ease off at once. Trust that feedback through the handles, because your hands often sense the change before your eyes do.
Crushing Instead of Cutting the Hoof
Crushing instead of cutting usually means your tool needs attention. Dull blades and a loose pivot mash the wall rather than shear it, which splits the horn and leaves a ragged edge. Sharp cutting edges and a snug, lubricated joint give you a clean, precise cut.
Inspect the blades before every job and keep up with hoof nipper maintenance on a set schedule. Regular pivot lubrication and honing preserve the shearing action for years of hard use. The American Farriers Journal notes that well maintained tools are a mark of a serious professional.
A crushed hoof wall is not only ugly, it also weakens the horn and invites cracks. Treat maintenance as part of the trim, not an afterthought. Your tools reward that care with cleaner cuts and longer life. Store your nippers in a dry place and wipe them down after each horse to prevent rust on the blades. A rag, a drop of oil, and a quick pass with a stone are enough to keep the tool ready.
Ignoring Hoof Balance
Ignoring balance turns a quick trim into a lasting problem. An unbalanced foot stresses joints, tendons, and ligaments over time and shortens the life of the trim. Make balance the goal of every cut, not an afterthought at the finish.
Check the foot from several angles and compare it to the opposite hoof throughout the trim. A balanced hoof lands flat and wears evenly between visits to the barn. This focus on balance is what protects the horse’s long term soundness.
Balance is where craft and welfare meet in one skill. A tidy foot that lands crooked has still failed the horse. Judge your work by how it moves, not only by how it looks. Learn to read side to side balance and front to back balance as two separate questions on every foot. Answer both well, and the horse moves freely, wears its feet evenly, and stays sound between trims.
How to Practice Using Hoof Nippers Safely
Safe practice is how new farriers build skill without risking a live horse. A structured practice plan lets you make and correct errors in a low pressure setting. Hoof nipper safety improves fastest when you rehearse the motion before you rely on it.
Deliberate practice beats random repetition every time. Focus on one habit at a time, get feedback, and only then add speed. These farrier training tips will shorten your learning curve while keeping every horse comfortable. Break the trim into single skills, such as grip, angle, or balance, and drill each one until it is solid. Sound farrier safety habits protect both you and the horse, so build them in from your very first session.
Practice on Training Hooves First
Practice on a training hoof or a cadaver hoof before you trim a standing horse. A training hoof holds still, feels nothing, and lets you focus purely on grip, angle, and cutting depth. You can repeat cuts, study the horn, and build muscle memory without any risk to an animal.
Set clear goals for each session, such as an even angle or a clean toe. Use these repetitions to groove the correct motion into your hands and body. Safe hoof handling starts long before a real horse is ever involved.
Photograph your practice feet before and after each session to track your progress. Seeing your own improvement builds motivation and sharpens your eye. Small, measurable wins keep you moving forward with purpose. Try mounting a practice hoof in a vise so you can rehearse your stance and angle from every side. The more realistic your practice setup, the smoother the move to a live horse will feel.
Work under an Experienced Farrier
Work under an experienced farrier as early and as often as you can. A skilled mentor spots errors you cannot see and corrects them before they become habits. Supervised practice and a farrier apprenticeship remain the gold standard for real world learning.
Ask questions, watch closely, and request honest feedback on your grip and technique. A good mentor also models calm handling that keeps horse comfort front and center. Programs backed by the International Association of Professional Farriers connect beginners with qualified teachers.
Treat every day beside a mentor as paid tuition in a trade you are building. Show up early, stay curious, and take notes you can review later. The habits you copy now will shape your whole career. Offer to hold horses, clean feet, and carry tools so you earn more time at the anvil and the hoof. Generosity with your effort often buys the mentoring that no course can sell.
Prioritize Accuracy before Speed
Prioritize accuracy before speed at every stage of your training. Clean, balanced trims matter far more than fast ones while you are still learning. Speed built on shaky technique only multiplies your mistakes across every hoof you touch.
Time yourself only after your cuts are consistently accurate and level. Let precision become automatic, and efficient speed will arrive on its own. This patient path is one of the most valuable farrier training tips you will ever follow.
Clients remember a balanced, sound horse long after they forget how long the trim took. Reputation grows from quality, not from a fast clock. Build your name on accuracy, and the busy schedule follows. Set a personal standard that every foot leaves your hands balanced, whether it is your first horse or your tenth. Hold that line early, and speed becomes a bonus rather than a shortcut that costs you quality. Slow, careful work today is exactly what earns the fast, confident hands you want to have tomorrow.
Hoof Nipper Tips for New Farriers FAQs
Are hoof nippers difficult for beginners to use?
Hoof nippers feel awkward at first, but they are not hard to learn with steady practice. Most new farriers struggle with angle and depth rather than strength, so slow, steady cuts help right away. Practice on training hooves, follow a set routine, and the tool quickly starts to feel natural in your hands. Give yourself a few weeks of honest repetition, and the awkward stage passes faster than you expect.
How should a beginner hold hoof nippers?
Hold hoof nippers firmly with both hands, fingers wrapped around each handle and thumbs steady for control. Cut using the power of your legs, back, and shoulders rather than your wrists alone. This body driven grip gives you clean shearing power, better accuracy, and far less hand fatigue over a full day. If your hands ache after a few feet, check your stance and grip before you blame the tool.
How much hoof wall should be removed with hoof nippers?
Remove only the excess wall that sits above the live sole and the white line. Trim conservatively, take small bites, and check the length often against these natural landmarks. You can always cut a little more, but you cannot replace horn, so stopping early is always the safer choice for the horse. When you are unsure, leave a touch more wall and refine the finish with your rasp.
Why do hoof nippers crush instead of cut the hoof?
Hoof nippers crush the wall when the blades are dull or the pivot joint is loose or dry. Sharp edges and a snug, lubricated pivot restore the clean shearing action you need. Inspect the blades before every job and keep a regular maintenance schedule so your cuts stay precise and tidy. A quick test cut on a scrap of hoof tells you at once whether the tool is ready.
How can new farriers improve their trimming accuracy?
New farriers improve trimming accuracy by slowing down, checking balance often, and cutting at one even angle. Start at the toe, work toward the heels, and view the foot from several sides between cuts. Regular supervised practice with a seasoned mentor speeds progress more than any other single habit. Keep a simple log of what worked and what did not, and your accuracy climbs week by week.
How often should a horse’s hooves be trimmed with hoof nippers?
Most horses need a trim every six to eight weeks, though the exact cycle depends on growth, workload, and season. Horses with fast growing hooves may need attention sooner, while others can wait a little longer. Watch for flares, cracks, and lost balance, since these signs tell you a trim is due. A consistent schedule keeps feet healthy and makes each trim quicker and easier.
What size hoof nippers should a new farrier buy?
New farriers usually start well with a fourteen or fifteen inch nipper, which balances leverage and control. Larger nippers remove wall faster but can feel heavy and hard to steer at first. Choose a size that fits your hand and the horses you serve, and prioritize a quality tool over a cheap one. A well made nipper holds its edge longer and pays for itself over many trims.
How do you maintain and sharpen hoof nippers for clean cuts?
Maintain hoof nippers by wiping them clean, honing the blades, and lubricating the pivot on a regular schedule. Sharp edges shear the wall cleanly, while a smooth joint keeps the jaws aligned and true. Send nippers to a professional sharpener when honing no longer restores a crisp, precise cutting edge. A few minutes of care after each job keeps your tool cutting like new for years.
Building skill with hoof nippers takes patience, steady practice, and a genuine respect for the horse under your care. Focus on reading the hoof, holding the tool correctly, and making small, balanced cuts, and your confidence will grow with every trim. These hoof nipper tips for new farriers give you a proven foundation you can return to again and again as you learn. Keep practicing on training hooves, keep learning from mentors, and treat every mistake as a lesson rather than a failure. Progress in this trade is steady and earned, so trust the process and stay patient with yourself. When you face a tricky hoof, a lame horse, or a case beyond your current skill, consult your veterinarian or a certified farrier for guidance tailored to that horse’s individual needs.